Makeup Explained: Complete Beginner's Guide to Everyday Makeup, Products, Techniques, Tools & Professional Tips 2026
Makeup can feel overwhelming when you're just starting out — endless products, confusing terminology, and a hundred different tutorials all claiming to show the "right" way to do things. The truth is there is no single correct way to do makeup, but there are foundational principles that make everything easier once you understand them: how skin prep affects the final result, the logical order products are meant to be layered in, and which tools and techniques actually make a visible difference versus which ones are just personal preference.
This guide walks through everything a beginner needs to know, from the skincare that happens before a single product touches your face, through every major category of face, eye, and lip makeup, all the way to the small habits — brush cleaning, product expiry, application order — that separate a look that lasts all day from one that starts sliding by noon. Whether you want a simple five-minute everyday face or you're building toward more elaborate looks for special occasions, the fundamentals covered here apply to both.
Rather than treating this as a rigid step-by-step tutorial to follow exactly, think of it as a reference you can return to as your skills grow. Some sections will matter more to you than others depending on your personal style — someone who loves a bold eye look may skim past the lipstick section, while someone focused on a natural everyday face may spend far more time on foundation and concealer. Both approaches are equally valid, and the goal of this guide is simply to give you the knowledge to make informed choices either way.
1. What Is Makeup and Why People Wear It
Makeup refers to cosmetic products applied to the face and body to enhance, alter, or accentuate natural features. People wear makeup for a wide range of reasons — to feel more confident, to express creativity, to even out skin tone, to highlight favorite features, or simply because they enjoy the ritual of it. None of these reasons are more valid than another, and the amount of makeup someone chooses to wear, from a bare-faced "no makeup" look to full glam, is entirely a matter of personal preference rather than a fixed rule anyone needs to follow.
It's also worth remembering that makeup trends and techniques change constantly, but the underlying principles — matching products to your skin type, prepping skin properly, and blending thoroughly — stay largely the same regardless of which specific look happens to be popular at any given time. Learning these fundamentals means you'll be equipped to recreate almost any trend you come across, rather than needing to relearn your entire routine every time a new style becomes popular.
2. Skincare Before Makeup: Why Skin Prep Matters
The single biggest factor in how good makeup looks and how long it lasts is not the makeup itself — it's the skin underneath it. Applying foundation over dry, flaky, or unmoisturized skin tends to look patchy and emphasizes texture, while makeup applied over well-hydrated, properly prepped skin sits smoothly and blends far more easily. This is why nearly every professional makeup routine begins with skincare rather than makeup itself.
| Skincare Step | Purpose Before Makeup |
|---|---|
| Cleansing | Removes overnight oil, sweat, and residue so makeup applies to a clean surface |
| Moisturizing | Creates a smooth, hydrated base that prevents makeup from clinging to dry patches |
| Sunscreen | Protects skin from UV damage; should be applied daily even under makeup |
| Eye Cream (optional) | Prevents concealer from settling into fine lines or looking dry under the eyes |
| Lip Balm (optional) | Softens lips so lipstick and gloss apply smoothly without emphasizing dry patches |
It's worth waiting a minute or two after each skincare step before moving to the next one, and again before starting makeup, so that every product has time to properly absorb rather than sitting on the surface and interfering with the products layered on top.
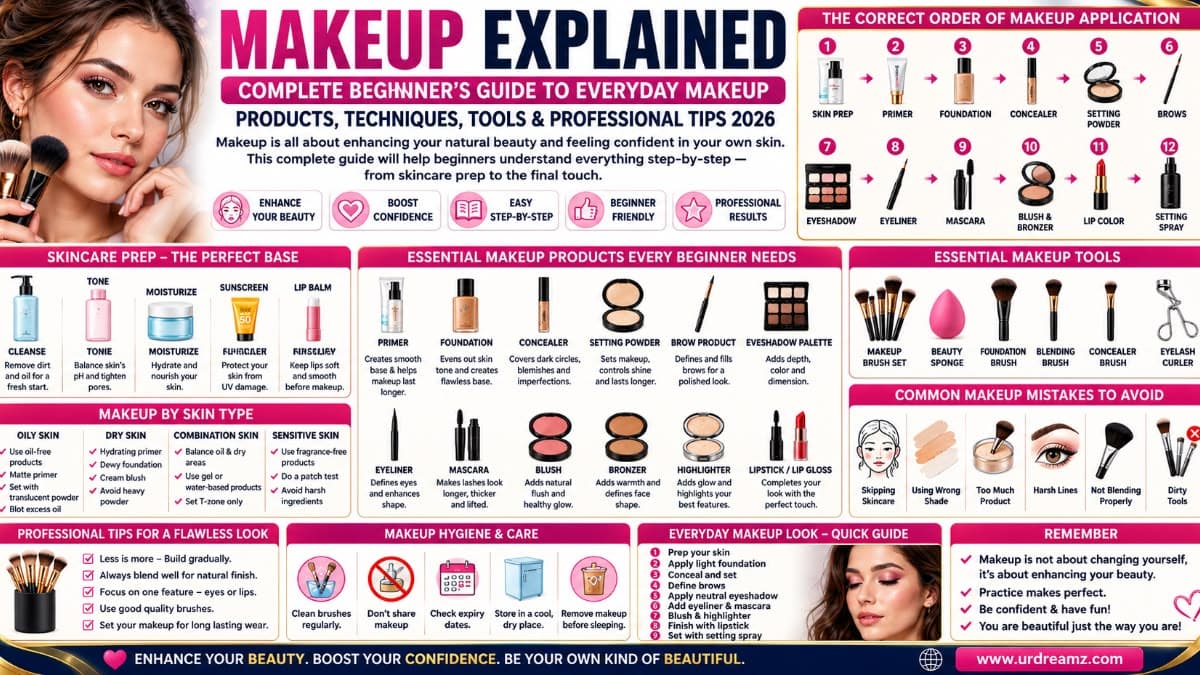
3. The Correct Order of Makeup Application
While there is no single rulebook that everyone follows exactly, most makeup routines are built around the same general logic: thinner, skin-like products go on first, and more pigmented, targeted products are layered on top. Understanding this order helps explain why certain products are meant to go before others rather than being interchangeable.
Following this general sequence also has a practical purpose beyond just tradition — applying products out of order can genuinely affect how well your makeup performs. Powder applied before a cream product, for example, creates a barrier that prevents the cream from blending smoothly, while skipping straight to color products before your base is fully set can smudge or disturb the work you've already done. Once you understand the reasoning, it becomes much easier to adapt the order intentionally rather than simply memorizing a list.
| Step | Product | Purpose |
|---|---|---|
| 1 | Moisturizer & Sunscreen | Prepares and protects the skin |
| 2 | Primer | Smooths texture and helps makeup last longer |
| 3 | Foundation | Evens out overall skin tone |
| 4 | Concealer | Targets specific areas like dark circles or blemishes |
| 5 | Setting Powder | Sets foundation and concealer, controls shine |
| 6 | Bronzer, Blush, Highlighter | Adds dimension, warmth, and glow |
| 7 | Eyebrows | Frames and defines the face |
| 8 | Eyeshadow & Eyeliner | Defines and adds color to the eyes |
| 9 | Mascara | Opens up and defines the lashes |
| 10 | Lip Color | Completes the look |
| 11 | Setting Spray | Locks everything in place for longer wear |
Some people prefer to do eye makeup before foundation, so that any eyeshadow fallout can be cleaned up without disturbing the base underneath. Both approaches are common among professional makeup artists, and it ultimately comes down to which order feels more comfortable and produces a cleaner result for you.

4. Primer Explained
Primer is applied directly after skincare and before foundation, acting as a smoothing base that fills in fine lines, minimizes the appearance of pores, and helps the rest of your makeup adhere better and last longer throughout the day. Primers come in different finishes — hydrating, mattifying, pore-blurring, and color-correcting among them — and choosing one suited to your skin type and main concern makes a noticeable difference in how your foundation behaves once applied.
| Primer Type | Best For |
|---|---|
| Hydrating Primer | Dry or dehydrated skin |
| Mattifying Primer | Oily or combination skin, controlling shine |
| Pore-Blurring Primer | Visibly enlarged pores or uneven texture |
| Color-Correcting Primer | Neutralizing redness (green) or dullness (peach/lavender) |
| Illuminating Primer | Adding a subtle radiant glow underneath foundation |
A small, dime-sized amount applied and gently pressed into the skin, starting from the center of the face and working outward, is generally enough — using too much primer can actually make foundation harder to blend rather than easier.
5. Foundation Explained: Types, Shade Matching, and Application
Foundation is the product most people associate with "base makeup," designed to even out skin tone and provide a uniform canvas for everything applied afterward. It comes in a wide range of formulas and coverage levels, and choosing the right one depends on your skin type, how much coverage you want, and how much time you're willing to spend on application.
It's worth remembering that foundation is not meant to completely erase your natural skin texture or transform your complexion into something unrecognizable — the best application generally still looks like your skin, just more even. Many beginners initially reach for far more coverage than they actually need, when in reality a lighter formula, applied skillfully with good skin prep underneath, often looks more polished than a heavy, full-coverage product applied without enough blending.
| Foundation Type | Coverage | Best For |
|---|---|---|
| Liquid Foundation | Light to full, buildable | Most skin types; the most versatile option |
| Powder Foundation | Light to medium | Oily skin, quick application, touch-ups |
| Stick Foundation | Medium to full | Travel, precise spot coverage, quick blending |
| Cream Foundation | Medium to full | Dry skin, colder weather |
| BB Cream | Light, skincare-forward | Everyday wear, minimal makeup days |
| CC Cream | Light, color-correcting | Redness or dullness with minimal coverage needs |
5.1 How to Choose Your Foundation Shade
The most reliable way to find your shade is to test a small amount along your jawline, in natural daylight if possible, rather than on the back of your hand, which is often a different tone than your face. The correct shade should appear to disappear into the skin without a visible line once blended, neither sitting noticeably lighter nor darker than the surrounding neck and jaw area.
5.2 How to Apply Foundation Without Looking Cakey
Starting with a small amount and building coverage gradually, rather than applying a thick layer all at once, is the single most effective way to avoid a heavy, cakey finish. Whether you use a brush, a damp sponge, or clean fingers, blending outward from the center of the face and buffing thoroughly into the skin — rather than dragging product across the surface — produces a far more natural, skin-like result.
6. Concealer Explained: Color Correction and Coverage
Concealer is a more concentrated, targeted product used to cover specific concerns — dark circles, blemishes, redness, or uneven pigmentation — that foundation alone may not fully address. It's generally applied after foundation, though some people prefer applying it first and setting it independently for extra longevity in high-movement areas like under the eyes.
| Concern | Corrector Color | Why It Works |
|---|---|---|
| Dark Circles (blue/purple tint) | Peach or orange-based corrector | Warm tones neutralize cool, bluish discoloration |
| Redness / Blemishes | Green-based corrector | Green sits opposite red on the color wheel, canceling it out |
| Dullness / Sallow Tone | Lavender or purple-based corrector | Purple counteracts yellow undertones for a brighter finish |
| General Coverage | Skin-tone matching concealer | Blends seamlessly for everyday spot coverage |
Under the eyes, a concealer shade slightly lighter than your foundation, applied in a small triangle shape rather than just a crescent, brightens the area more effectively and helps counteract shadowing. To prevent it from creasing into fine lines throughout the day, setting it with a light dusting of translucent powder and letting each layer settle for a minute before adding more product both help significantly.
6.1 Understanding Skin Undertones and Color Theory
Beyond matching foundation to your overall skin tone, understanding your undertone — the subtle hue beneath the surface of your skin — can make shade matching considerably easier. Undertones are generally categorized as warm (yellow or golden), cool (pink or blue), or neutral (a balance of both), and this same understanding extends into concealer and color correction, which relies on basic color theory: colors positioned opposite each other on the color wheel neutralize one another when layered together. This is exactly why a green corrector cancels out redness, and why a peach or orange corrector counteracts the bluish tone common in dark circles — each corrective color is chosen specifically because of its position relative to the concern being addressed.
A simple way to get a rough sense of your undertone is to look at the veins on the inside of your wrist in natural light: veins that appear more blue or purple often suggest a cooler undertone, while veins that lean green often suggest a warmer one, though many people fall somewhere in between and are considered neutral.
7. Setting Powder Explained
Setting powder is applied over liquid or cream products to lock them in place, control shine, and extend wear time. Using too much can look heavy and emphasize texture, particularly on dry skin, so a light, targeted application — focused mainly on the T-zone and under the eyes rather than the entire face — tends to give the most natural, long-lasting result without looking overdone.
8. Contouring, Bronzer, Blush, and Highlighter
These four products work together to add dimension, warmth, and glow back into the face after foundation and concealer have flattened and evened out the complexion. Understanding the distinct role each one plays makes it much easier to use them effectively rather than treating them as interchangeable.
It helps to think of this stage as recreating the natural shadows and highlights that sunlight would normally cast across your face. Foundation and concealer, by design, remove a lot of that natural variation in tone, so contour, bronzer, blush, and highlighter exist specifically to reintroduce it in a controlled, flattering way, rather than being purely decorative additions.
| Product | Purpose | Where to Apply |
|---|---|---|
| Contour | Creates shadow to sculpt and slim the appearance of facial features | Hollows of the cheeks, sides of the nose, jawline, temples |
| Bronzer | Adds warmth and a sun-kissed tone | High points where sun naturally hits: forehead, cheekbones, nose, chin |
| Blush | Adds a natural flush of color | Apples of the cheeks, blended up toward the temples |
| Highlighter | Reflects light for a radiant, lifted look | Cheekbones, brow bone, bridge of the nose, cupid's bow |
A common beginner mistake is confusing bronzer with contour — bronzer is meant to add overall warmth and color, while contour is specifically meant to create the illusion of shadow and structure. Using a contour shade that's too warm or orange-toned can end up looking like poorly blended bronzer rather than genuine sculpting.
8.1 Contouring by Face Shape
| Face Shape | General Contour Approach |
|---|---|
| Round | Contour along the sides of the forehead and jaw to add definition and length |
| Square | Soften strong angles by contouring the corners of the jaw and forehead |
| Oval | Minimal contouring needed; a light touch under the cheekbones is usually enough |
| Heart | Focus contour along the temples and jawline to balance a wider forehead |
| Long | Contour the top of the forehead and bottom of the chin to visually shorten the face |
These are general starting points rather than fixed formulas, and many people find that a lighter, more universal contour placement works just as well day to day as a heavily face-shape-specific technique, particularly for a natural everyday look rather than a dramatic sculpted one.
9. Eyebrow Makeup
Eyebrows frame the entire face, and even a small amount of well-blended product can make a noticeable difference in how put-together a look feels. Filling in sparse areas with light, hair-like strokes rather than solid blocks of color, and always brushing brows into place with a spoolie afterward, keeps the result looking natural rather than drawn-on.
| Product | Best For |
|---|---|
| Brow Pencil | Precise, hair-like strokes for sparse areas |
| Brow Gel | Quick, low-maintenance definition and hold |
| Brow Pomade | Fuller, more defined, longer-wearing looks |
| Tinted Brow Serum | Very natural, subtle definition with added nourishment |
10. Eyeshadow: Basics for Beginners
Eyeshadow can feel like the most intimidating part of makeup for beginners, but a simple two-shade approach — one lighter shade across the lid and one slightly deeper shade in the crease — is enough to create a polished, put-together eye look without needing a large collection of colors. Blending the transition between the two shades thoroughly, using a clean, fluffy brush, is what separates a soft, professional-looking result from a harsh, uneven one.
A helpful habit for beginners is applying eyeshadow before foundation and concealer, so that any loose powder fallout that lands under the eyes can simply be wiped away without disturbing your base makeup underneath. Placing a small amount of loose powder or a tissue folded into a crescent shape just under the eyes before starting eyeshadow, then removing it once eye makeup is complete, is a simple trick that keeps fallout from becoming a problem in the first place.
10.1 Choosing Eyeshadow Shades by Eye Color
| Eye Color | Flattering Shadow Tones |
|---|---|
| Brown Eyes | Nearly any shade works well, though purples, blues, and golds tend to stand out especially |
| Blue Eyes | Warm oranges, coppers, and browns help make blue eyes appear brighter by contrast |
| Green Eyes | Reds, purples, and warm browns tend to enhance green tones effectively |
| Hazel Eyes | Both warm and cool tones can work, since hazel often shifts depending on the shade used |
These pairings are general guidelines based on color theory rather than strict rules, and experimenting outside of them is part of the fun of learning eye makeup — the "right" shadow is ultimately whichever one makes you feel most confident in the mirror.
11. Eyeliner: Types and Application
| Type | Best For | Application Tip |
|---|---|---|
| Pencil Eyeliner | Beginners, waterline application, smoky looks | Easiest to control and smudge for a softer effect |
| Gel Eyeliner | Precise, longer-wearing definition | Use a thin, angled brush for control |
| Liquid Eyeliner | Sharp lines, winged looks | Build in small strokes rather than one continuous line |
For a winged look, mapping out the angle with small dots before committing to a full line makes it far easier to keep both sides symmetrical, and using short, connecting strokes rather than trying to draw one perfect sweep from end to end reduces the chance of a shaky or uneven result.
12. Mascara: Getting the Most from Every Coat
Mascara is often considered the single most impactful product in a quick makeup routine, since it opens up the eyes and adds definition with minimal effort. Curling lashes beforehand, wiggling the wand at the base of the lashes before pulling upward and outward, and allowing each coat to dry slightly before adding another all help build volume and length without the clumping that comes from applying too much product too quickly.
13. Lip Makeup: Lipstick, Lip Liner, and Gloss
| Product | Finish | Best For |
|---|---|---|
| Matte Lipstick | Flat, no shine, long-wearing | All-day color without touch-ups |
| Glossy Lipstick | Shiny, reflective | Fuller-looking, more youthful appearance |
| Lip Liner | Defines the lip shape | Preventing color from bleeding, extending lipstick wear |
| Lip Gloss | High shine, often sheer | Layering over lipstick or wearing alone for a natural look |
| Lip Tint | Sheer, natural-looking color | A quick "your lips but better" everyday look |
To choose a flattering shade, look at the natural gradient of color on your own lips — the lightest tone works well as an everyday nude, while the deepest natural tone can guide you toward a flattering evening shade. Lip liner applied slightly inside your natural lip line, then filled in and blended with the lipstick itself, helps prevent that liner from being visible as a separate outline once the color is applied.
14. Setting Spray: Locking In Your Look
Setting spray is the final step, applied after all other makeup, to help everything sit together and last longer without excessive shine, creasing, or fading. Holding the bottle roughly eight inches from the face and misting lightly in a loose "X" and then "T" motion covers the whole face evenly without oversaturating any one area.
15. Essential Makeup Tools
Good technique matters more than expensive products, but having the right tool for each step makes a genuine difference in how easily a product blends and how natural the final result looks. Investing in a small set of quality basics tends to pay off more than owning dozens of brushes that rarely get used.
| Tool | Best Use |
|---|---|
| Foundation Brush | Even, buildable foundation application |
| Beauty Sponge | Natural, skin-like foundation and concealer finish |
| Powder Brush | Light, even application of setting powder |
| Contour/Bronzer Brush | Angled for precise placement along cheekbones and jaw |
| Blush Brush | Soft, fluffy bristles for a natural flush |
| Eyeshadow Brushes (set) | Different sizes for packing color, blending, and precision |
| Angled Brow Brush | Precise, hair-like brow application |
| Spoolie Brush | Blending brow product and brushing lashes/brows into place |
| Eyelash Curler | Opens up the eyes before mascara application |
You don't need every tool listed here to create a polished look — a good foundation brush or sponge, one or two eyeshadow brushes, and a spoolie will comfortably handle most everyday routines, with additional specialized tools added gradually as your routine and interests expand.
16. Makeup by Skin Type
Just as with skincare, makeup performs differently depending on your underlying skin type, and choosing formulas suited to your specific skin can mean the difference between makeup that looks fresh all day and makeup that separates, slides, or emphasizes texture within a few hours.
| Skin Type | Recommended Approach |
|---|---|
| Oily Skin | Oil-free, matte or long-wear foundation; mattifying primer; setting powder focused on the T-zone; oil-blotting sheets for midday touch-ups |
| Dry Skin | Hydrating primer and foundation; cream-based blush and highlighter; minimal powder to avoid emphasizing dry patches |
| Combination Skin | Balanced, satin-finish foundation; powder only on the oily T-zone; hydrating products on drier cheek areas |
| Sensitive Skin | Fragrance-free, hypoallergenic formulas; mineral-based products; always patch test new items first |
| Acne-Prone Skin | Non-comedogenic, oil-free formulas; clean tools and frequent brush washing to avoid worsening breakouts |
| Mature Skin | Hydrating, dewy-finish formulas; cream products that don't settle into fine lines; light, buildable coverage rather than heavy matte finishes |
17. Makeup Looks for Every Occasion
Once you're comfortable with the individual products and techniques covered throughout this guide, adapting them to different occasions becomes mostly a matter of adjusting coverage, color intensity, and how much time you spend on blending and precision, rather than needing to learn an entirely new approach for each event.
| Look | Key Characteristics |
|---|---|
| No-Makeup Makeup | Sheer base, minimal color, focus on skin texture and natural brows/lashes |
| Natural Everyday Look | Light coverage foundation, soft blush, neutral eyeshadow, tinted lip balm |
| Office Makeup | Polished but understated: medium coverage, soft eyeliner, muted lip color |
| Soft Glam | Dewy base, subtle shimmer, defined lashes, glossy or muted lip |
| Party / Evening Glam | Fuller coverage, smoky or bold eye look, statement lip, added highlighter |
| Bridal Makeup | Long-wear, photograph-friendly formulas; careful blending for close-up detail; typically trialed in advance |
Most looks are built from the same foundational steps covered earlier in this guide — the difference lies mainly in coverage level, color intensity, and how much time is spent on blending and precision, rather than requiring an entirely different set of products.
17.1 A Closer Look at Bridal Makeup
Bridal makeup deserves special mention since it comes with unique requirements most other looks don't. It needs to photograph well under a variety of lighting conditions, survive hours of wear including tears, hugs, and weather, and often needs to be trialed in advance to fine-tune the exact shade and coverage level well before the actual event. Long-wear, transfer-resistant formulas are generally prioritized over trendier textures, and waterproof mascara and lip color are almost always a safer choice than their standard counterparts for this specific occasion.
18.1 How to Remove Makeup Properly
How you take makeup off matters almost as much as how you put it on, since leftover product left on the skin overnight can contribute to clogged pores, irritation, and a duller complexion over time. A two-step approach — first using a dedicated makeup remover, micellar water, or cleansing balm to break down long-wear and waterproof products, followed by a regular cleanser to fully clear the skin — tends to be far more effective than trying to remove a full face of makeup with a single facial wash.
| Removal Method | Best For |
|---|---|
| Micellar Water | Light, everyday makeup; quick removal without rinsing |
| Cleansing Balm or Oil | Waterproof mascara, long-wear foundation, heavy makeup |
| Makeup Wipes | Travel or emergency use; not a substitute for proper cleansing |
| Double Cleansing | Oil-based cleanser followed by a water-based one for the most thorough removal |
Being gentle around the delicate eye area during removal, using a soft patting or light sweeping motion rather than aggressive rubbing, helps avoid unnecessary irritation or premature fine lines in this thinner, more sensitive skin.
18.2 Makeup for Men
Interest in grooming and light makeup use among men has grown steadily, and the same core principles apply regardless of who is wearing it. Most men who wear makeup tend to favor a natural, undetectable approach — a lightweight tinted moisturizer or concealer to even out tone, a touch of brow gel to tame unruly brows, and occasionally a matte bronzer for warmth — rather than full coverage foundation or colorful eye looks, though there is no rule preventing anyone from wearing as much or as little makeup as they'd like.
18.3 Trending Makeup Styles: Clean Girl, Dewy Skin, and Korean Makeup
Makeup trends shift constantly, but a few recurring styles are worth understanding since they represent broader shifts in how people approach coverage and finish. The "clean girl" aesthetic emphasizes minimal, skin-like makeup with glowing, hydrated skin, groomed brows, and a soft flush rather than heavy contouring. Korean makeup similarly prioritizes a dewy, "glass skin" finish achieved through lightweight, hydrating base products layered carefully rather than a single heavy foundation application, often paired with softly gradient lip color rather than a single solid block of color.
Understanding these trends isn't about needing to follow them exactly, but recognizing that they're built from the same fundamental techniques covered throughout this guide — skin prep, thin buildable layers, and careful blending — applied with a lighter, more natural hand than a fuller glam look would use.
19.1 How to Practice and Improve Your Makeup Skills
Makeup, like any skill, improves with repetition rather than through a single tutorial or purchase. Setting aside time to practice a technique — a winged eyeliner, a new eyeshadow blend, a contour placement — outside of a rushed morning routine gives you room to experiment and make mistakes without the pressure of needing to leave the house immediately afterward. Taking photos of your finished looks, in natural light if possible, also makes it much easier to spot areas that need more blending than they might appear to need in a close-up mirror, since photographs tend to reveal harsh lines or unblended edges more clearly than your own reflection.
20. Common Makeup Mistakes and How to Avoid Them
Most makeup mistakes are not about using the wrong products entirely, but about small habits in application, blending, or product choice that quietly undermine an otherwise good routine. Recognizing these patterns is often the fastest way to see a noticeable improvement in your everyday look.
| Mistake | Why It's a Problem | Fix |
|---|---|---|
| Skipping sunscreen under makeup | Even SPF-containing foundation rarely provides full protection alone | Apply a dedicated sunscreen as a separate skincare step |
| Matching foundation to your hand instead of your face | Hand skin is often a different shade than facial skin | Always swatch and blend along the jawline in natural light |
| Applying too much powder all over | Can look cakey and emphasize texture, especially on dry skin | Focus powder only on oily areas, leave the rest dewy |
| Rushing between product layers | Causes pilling, uneven texture, and shorter wear time | Allow 30–60 seconds between steps for products to set |
| Using dirty brushes | Leads to uneven color, muddy blending, and potential breakouts | Clean brushes weekly with a gentle brush cleanser |
| Choosing a contour shade that's too warm | Can look like poorly blended bronzer instead of genuine shadow | Choose a cool-toned, ashy contour shade for realistic sculpting |
| Over-plucking or over-drawing eyebrows | Can look unnatural and take years to correct | Use light, hair-like strokes and work with your natural shape |
19. Makeup Hygiene and Brush Cleaning
Makeup products and tools come into direct, repeated contact with the skin, which makes hygiene an important but often overlooked part of a routine. Brushes and sponges accumulate a mix of old product, oil, and bacteria over time, and using them without regular cleaning can contribute to breakouts, uneven application, and a shorter product lifespan overall.
| Tool | Recommended Cleaning Frequency |
|---|---|
| Foundation/Face Brushes | Weekly |
| Beauty Sponges | After every use, or at minimum every few uses |
| Eye Brushes | Every one to two weeks |
| Eyelash Curler | Wipe after every use with a cotton pad and gentle cleanser |
Beyond tools, it's also worth avoiding sharing eye and lip products with others, replacing mascara more frequently than other products since it's especially prone to bacterial growth, and washing hands before applying makeup with fingers to reduce the transfer of bacteria to the face.
20. Makeup Product Expiry Guide
| Product | Typical Shelf Life After Opening |
|---|---|
| Mascara | 3 months |
| Liquid Eyeliner | 3–6 months |
| Liquid Foundation | 6–12 months |
| Concealer | 6–12 months |
| Powder Products (blush, bronzer, eyeshadow) | 18–24 months |
| Lipstick | 12–18 months |
| Lip Gloss | 6–12 months |
A change in smell, texture, or color, or a product that starts separating or feels noticeably different from when it was new, is a reliable sign it's time to replace it, regardless of exactly how much time has passed.
21. How to Make Makeup Last All Day
Long-lasting makeup depends on a combination of proper skin prep, appropriate product choice for your skin type, and correct layering technique rather than any single "magic" product. Using a primer suited to your skin type, setting strategically rather than over-powdering the entire face, and finishing with a setting spray all work together to extend wear time. Carrying blotting papers or a small compact for midday touch-ups, particularly on oilier skin, also helps maintain a fresh look without needing to reapply an entire face of makeup.
22. Beginner Makeup Kit Checklist
| Category | Essential Items |
|---|---|
| Base | Moisturizer, primer, foundation or BB cream, concealer |
| Setting | Translucent setting powder, setting spray |
| Color | Blush, bronzer, highlighter |
| Eyes | Neutral eyeshadow palette, eyeliner pencil, mascara, brow pencil or gel |
| Lips | A nude and a bolder lipstick or tint, lip balm |
| Tools | Foundation brush or sponge, blush brush, eyeshadow brush, spoolie, eyelash curler |
This checklist covers the essentials for a complete, versatile everyday routine — additional specialty products can always be added later as specific interests or occasions call for them.
23. Budget vs Luxury Makeup
As with skincare, a higher price does not automatically guarantee better performance in makeup. Many affordable drugstore products contain formulas that perform comparably to significantly more expensive alternatives, with price differences often reflecting packaging, branding, and marketing rather than a meaningful difference in pigmentation or wear time. Investing a little more in products used closest to the eyes, such as mascara or eyeliner, can be worthwhile for comfort and safety, while items like setting powder or lip products often perform just as well at a lower price point.
24. Makeup Myths vs Facts
| Myth | Fact |
|---|---|
| Wearing makeup every day always causes acne | Non-comedogenic formulas and proper cleansing at night generally do not cause breakouts on their own |
| You need expensive products to look polished | Application technique and skin prep matter far more than price |
| Primer is always necessary | It's helpful for longevity and smoothing but not mandatory, especially for shorter wear |
| Setting powder should be applied all over the face | Targeted application on oily areas usually looks more natural than an all-over matte finish |
| More product always means better coverage | Thin, buildable layers generally look more natural and last longer than one thick application |
25. Quick Glossary of Makeup Terms
| Term | Meaning |
|---|---|
| Blending | Softening the edges between two products or colors so there's no visible line |
| Buffing | Working product into the skin in circular motions for a natural finish |
| Cut Crease | An eyeshadow technique that creates a sharp, defined line along the crease |
| Baking | Leaving powder on the skin for several minutes before dusting off for extra-long wear |
| Non-Comedogenic | Formulated to avoid clogging pores |
| Undertone | The underlying hue (warm, cool, or neutral) beneath your skin's surface tone |
26. Sample 5-Minute Everyday Face Routine
| Step | Full Routine | 5-Minute Version |
|---|---|---|
| 1 | Moisturizer + Sunscreen | Moisturizer + Sunscreen |
| 2 | Primer | Skip, or use a tinted SPF primer |
| 3 | Foundation | Tinted moisturizer or light BB cream |
| 4 | Concealer | Under-eyes only |
| 5 | Powder | Light dusting on the T-zone only |
| 6 | Bronzer/Blush/Highlighter | Cream blush applied with fingers |
| 7 | Eye Makeup | Skip, or a quick coat of mascara |
| 8 | Lip Color | Tinted lip balm |
| 9 | Setting Spray | Optional quick mist |
Keeping a streamlined version of your routine in your back pocket for busy mornings means you never have to choose between skipping makeup entirely and being late — a few well-chosen multi-use products can cover most of the key areas of the face in just a few minutes.
27. Frequently Asked Questions (FAQs)
What is the correct order to apply makeup?
A common order is moisturizer, primer, foundation, concealer, setting powder, bronzer, blush, highlighter, eyebrows, eye makeup, mascara, lip color, and finally setting spray, though this can be adjusted based on personal preference. Some people prefer doing eye makeup before base makeup so any fallout can be cleaned up without disturbing the foundation underneath.
What makeup products do beginners need?
A good starting kit includes moisturizer, a lightweight foundation or BB cream, concealer, a neutral eyeshadow palette, mascara, a brow pencil, blush, and a couple of versatile lip colors. Starting with a smaller, well-chosen collection makes it easier to learn each product thoroughly before expanding.
How do I choose the right foundation shade?
Test foundation along your jawline in natural light rather than on your hand; the correct shade should blend in without leaving a visible line once fully worked into the skin. If a shade sits between two options, choosing the lighter one and warming it slightly with bronzer is usually easier than trying to lighten a shade that runs too dark.
Is primer necessary before makeup?
It's not strictly required, but it helps smooth texture and extend wear time, making it especially useful for longer days or special occasions. For a very quick, low-coverage everyday look, skipping primer entirely is unlikely to make a noticeable difference.
How can I make my makeup last all day?
Proper skin prep, a primer suited to your skin type, targeted rather than all-over powder application, and a final setting spray all work together to extend wear time significantly. Carrying blotting papers for midday touch-ups also helps maintain a fresh look without needing to reapply everything.
Which makeup is best for oily skin?
Oil-free, matte or long-wear foundation, a mattifying primer, and setting powder focused on the T-zone tend to work best for oily skin. Blotting papers used throughout the day, rather than adding more powder each time, help control shine without building up a heavy, cakey layer.
Which makeup is best for dry skin?
Hydrating primer and foundation, cream-based blush and highlighter, and minimal powder generally give dry skin the most natural, comfortable finish. Setting spray with a hydrating rather than mattifying formula also helps avoid emphasizing any dry patches.
How do I stop foundation from looking cakey?
Apply thin layers and build coverage gradually rather than applying a thick layer all at once, and blend thoroughly with a brush, sponge, or fingers. Making sure skin is properly moisturized beforehand is just as important as the application technique itself.
What is the difference between bronzer and contour?
Bronzer adds overall warmth and a sun-kissed tone, while contour is specifically used to create shadow and the illusion of structure using a cooler, ashier shade. Using the two together, rather than as substitutes for one another, tends to give the most natural, dimensional result.
How do I apply blush naturally?
Smile to find the apples of your cheeks, then apply blush there and blend gently upward toward the temples for a natural-looking flush. Starting with a small amount and building up gradually prevents the harsh, overly bright look that can happen from applying too much at once.
How do beginners apply eyeliner?
Pencil eyeliner is generally the easiest for beginners to control, and mapping out a winged shape with small dots before committing to a full line makes symmetry much easier to achieve. Resting your elbow on a stable surface while applying also helps keep your hand steady for a cleaner line.
How do I choose the right lipstick shade?
Look at the natural gradient of color on your own lips — the lightest tone often works well as an everyday nude, and the deepest natural tone can guide you toward a flattering bolder shade. Testing shades against your jawline rather than the back of your hand also gives a more accurate preview.
How often should makeup brushes be cleaned?
Face brushes are generally recommended to be cleaned weekly, eye brushes every one to two weeks, and beauty sponges after every use or at minimum every few uses. Regular cleaning keeps colors true and application smooth, in addition to reducing the risk of breakouts.
How do I remove makeup properly?
Use a dedicated makeup remover or cleansing balm to break down long-wear products first, then follow with a gentle cleanser to fully clear the skin before bed. Skipping this two-step process, especially with waterproof products, often leaves a residue that a single cleanser cannot fully remove.
Can makeup cause acne?
Non-comedogenic, well-formulated makeup generally does not cause acne on its own, though wearing it consistently without proper cleansing or using dirty tools can contribute to breakouts. Choosing formulas labeled non-comedogenic is a simple way to reduce this risk for acne-prone skin.
Should I apply concealer before or after foundation?
Both orders are common; applying concealer after foundation lets you see exactly how much extra coverage is needed, while applying it first can offer more targeted, longer-lasting coverage in high-movement areas.
What is the difference between BB cream and foundation?
BB cream typically offers lighter, more skincare-forward coverage with added benefits like hydration or SPF, while foundation is generally formulated for more targeted, buildable coverage.
Do I need both primer and setting spray?
They serve different purposes — primer creates a smooth base before makeup, while setting spray locks the finished look in place — so using both can meaningfully extend wear time.
How do I know if my makeup has expired?
A noticeable change in smell, texture, separation, or color is a reliable sign a product should be replaced, even if it hasn't reached its typical expiry timeframe yet.
What are the must-have products for a quick makeup routine?
A tinted moisturizer or light foundation, concealer for the under-eyes, mascara, and a tinted lip balm cover the key areas of the face in just a few minutes. This simplified routine still hits the three main focal points of the face — skin, eyes, and lips — without requiring a full product lineup.
Should I apply foundation before or after eye makeup?
Most people apply foundation before eye makeup to create an even base, but for a bold or heavily pigmented eye look, doing eye makeup first allows any fallout to be cleaned up before foundation is applied.
Can I use concealer without foundation?
Yes, concealer alone can be used to spot-cover blemishes or brighten the under-eye area for a lighter, more natural look without full foundation coverage.
What color corrector should I use for dark circles?
A peach or orange-based corrector is generally recommended for dark circles, since these warm tones neutralize the cool, bluish discoloration common in this area.
Is liquid foundation better than powder foundation?
Neither is universally better — liquid foundation tends to offer more buildable, natural-looking coverage for most skin types, while powder foundation is often preferred for oily skin or quick touch-ups.
Do I need to buy expensive makeup brushes?
Not necessarily; well-made affordable brushes can perform just as well as expensive ones for most everyday techniques, and investing more is only worthwhile once you have a clear sense of which specific tools you use most often.
How much makeup should a beginner buy at once?
Starting with a small, versatile collection covering the basics — foundation or BB cream, concealer, mascara, a neutral eyeshadow, and a couple of lip colors — is generally more manageable than buying a large collection all at once before knowing your preferences.
What is the 3-1-1 rule some people mention for makeup?
It generally refers to a simplified approach of choosing three focal areas of the face — such as skin, eyes, and lips — and keeping the other elements more minimal, so the overall look stays balanced rather than overly busy.
Conclusion
Makeup is ultimately a skill built through practice, not a fixed set of rules everyone has to follow identically. Understanding the logic behind the standard application order, how different products are meant to work together, and which techniques actually make a visible difference gives you a solid foundation to build from — but from there, the best routine is always the one that fits your skin, your lifestyle, and the amount of time you genuinely want to spend on it each day.
There is no need to own every product mentioned in this guide or master every technique before you start. A simple routine built around a handful of well-chosen, well-blended products will almost always look more polished than an elaborate one applied hastily or without proper skin prep underneath. As your comfort and interest grow, you can gradually add new products, tools, and techniques, using this guide as a reference to come back to whenever you want to try something new.
Most importantly, makeup is meant to be a form of self-expression and confidence rather than a source of pressure. Whether your everyday look is a five-minute tinted moisturizer and mascara or a fuller face with contour, eyeshadow, and a bold lip, the "right" amount of makeup is simply whatever makes you feel most like yourself.